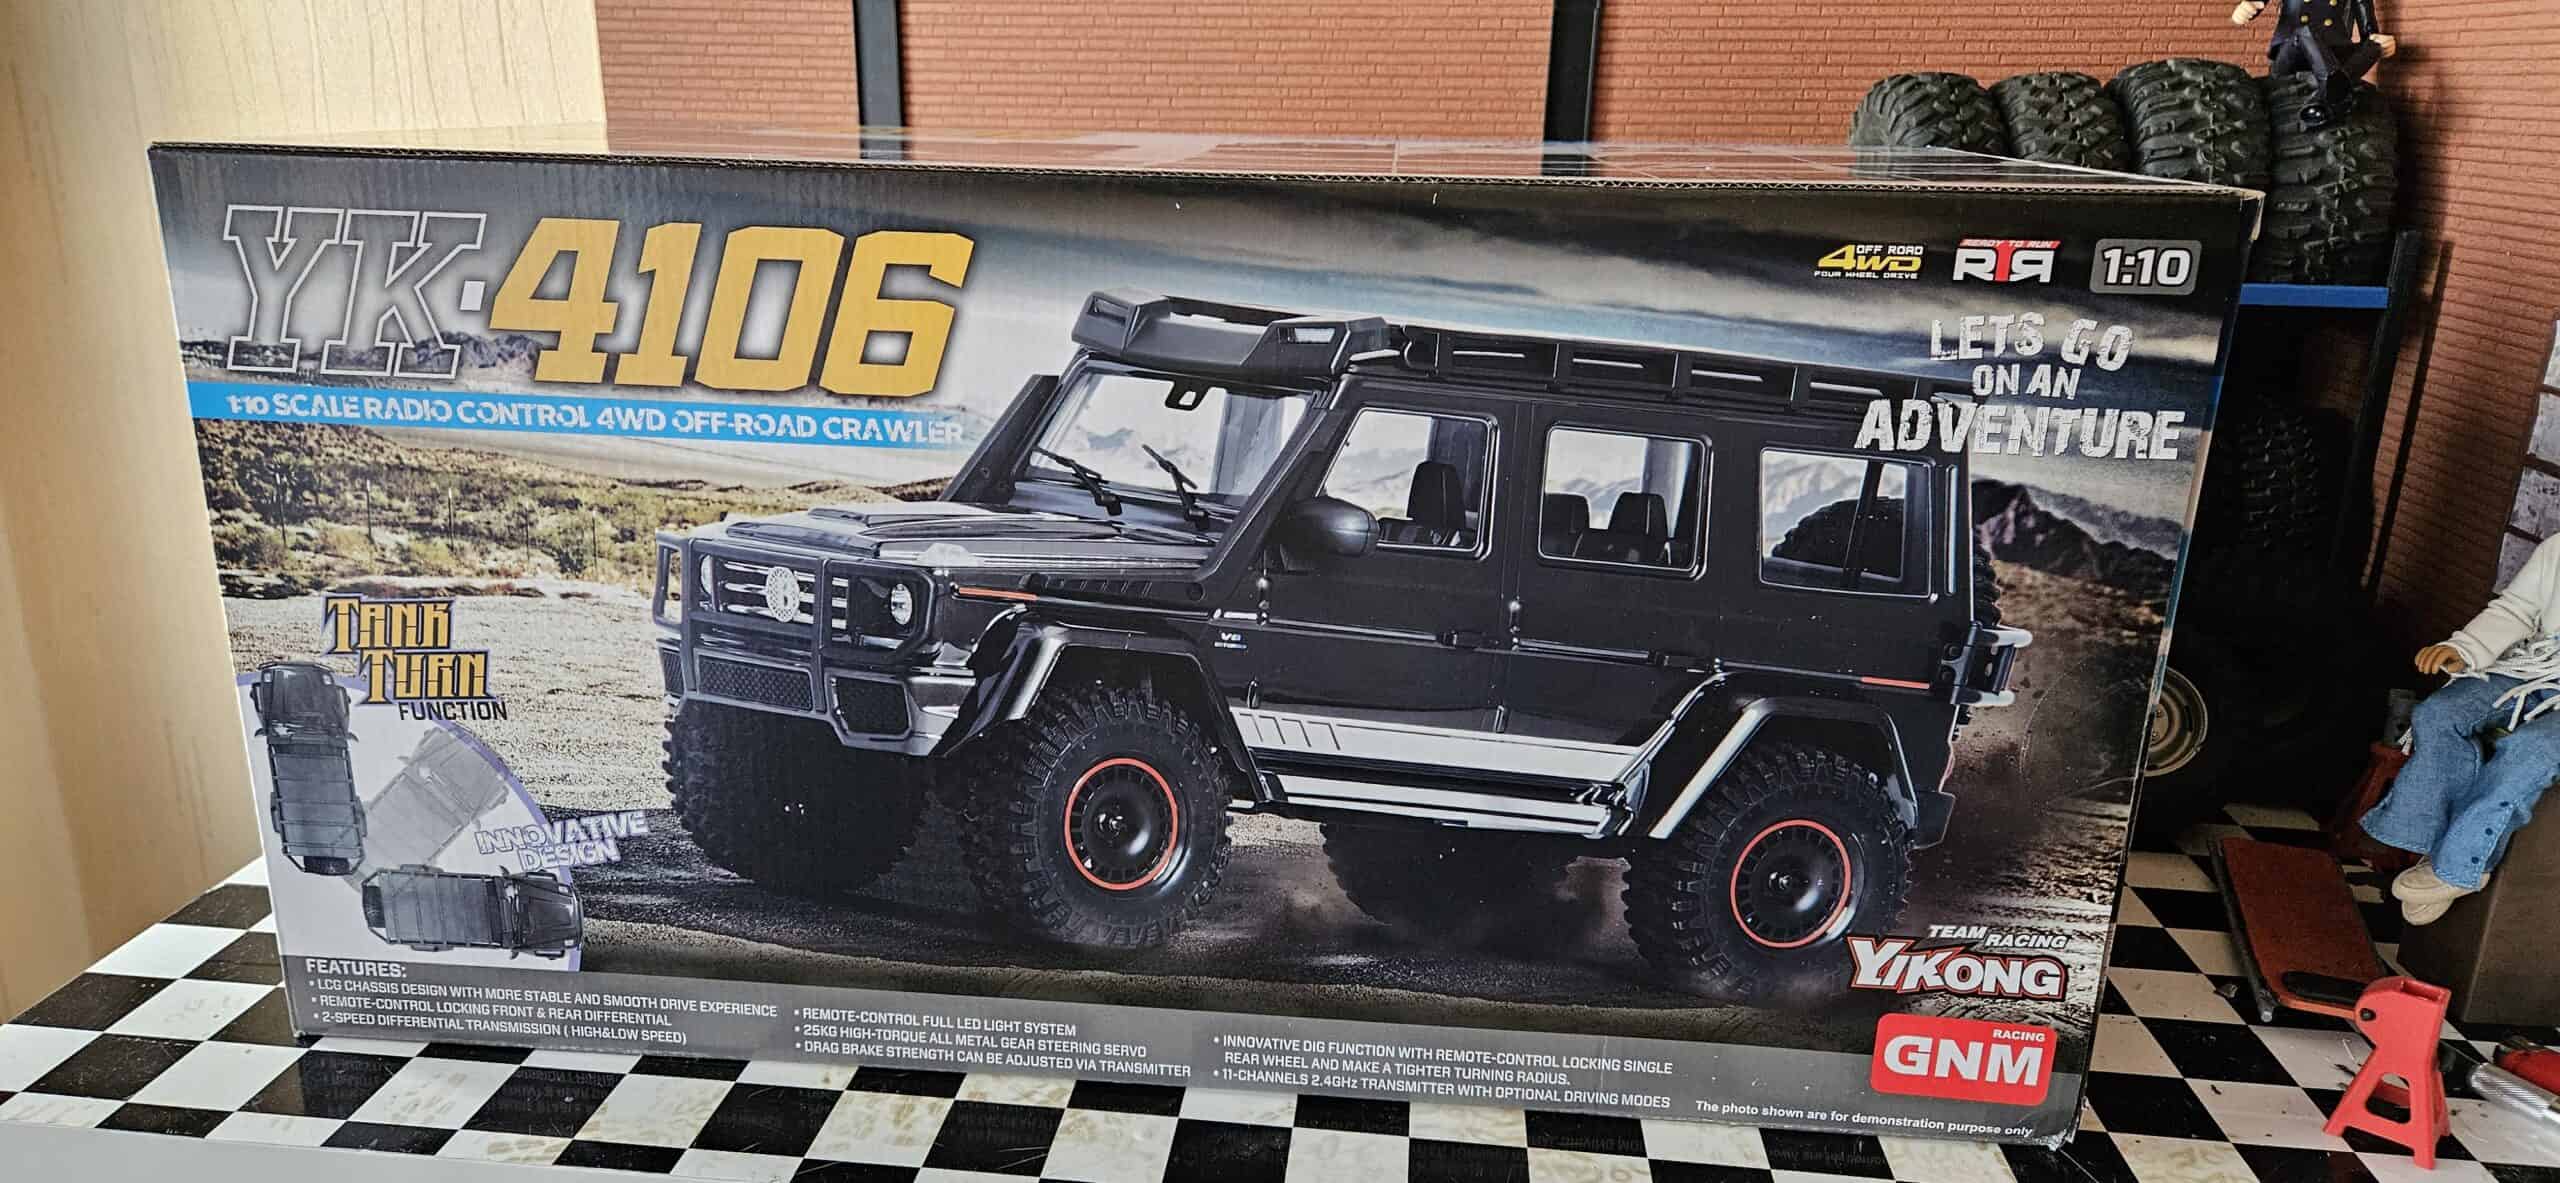
Yikong, whose products are rebadged by Absima in Europe (Sherpa, Landi, Khamba in 1/10, Yucatan in 1/8) and Amewi (LC70), has been offering a machine with classic appearances since January 2024 that some will say is inspired by Traxxas due to the choice of body but which hides something that is, to say the least, original.
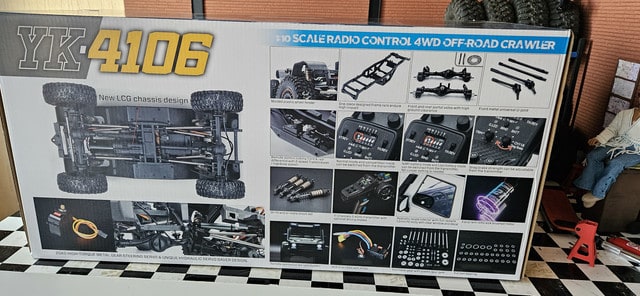
The packaging is very classic, with presentation of the different characteristics of the model, options still to come and the versions and colors available.
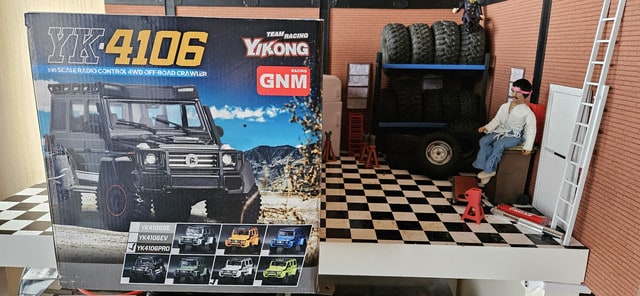
While the packaging mentions an EV version, only the SE and Pro versions are currently offered. 2 versions with different profiles…
SE: entry level, basic but 2 speed gearbox on the radio (6ch), manually lockable differentials directly on the axles, body with opaque windows, no spare wheel (just its support), no lighting.
Pro: the most equipped, 2 speed gearbox on the radio of course, but also with lockable differentials, a body with transparent windows (unless matte paint… as for the Sherpa, the clear coat is applied without masking the windows which gives them a frosted appearance), semi-3D interior (“trunk” pilot), lighting, spare wheel, and additional body accessories with a fake spare wheel support and a pair of snorkels (bi-turbo V8 requires ) … and of course, what makes this model special, the “Tank Turn” system.
The contents of the box is reduced to their simplest expression… the vehicle, its radio, a “Tamiya” key, a tab to adjust the battery tray and an optional bumper which requires cutting the bodywork, as well as the screws which go with it.

No manual, you need to download it via a QR-Code on the box, no sticker sheet, not even batteries for the radio.
Let’s start with the radio…
It’s a FlySky, the same as on the FCX10 which has just been released, in 11ch version for this Pro version. Compact and light, it fits well in the hand and will not tire the arm. Depending on your thumb, it may not be suited for one-hand driving.
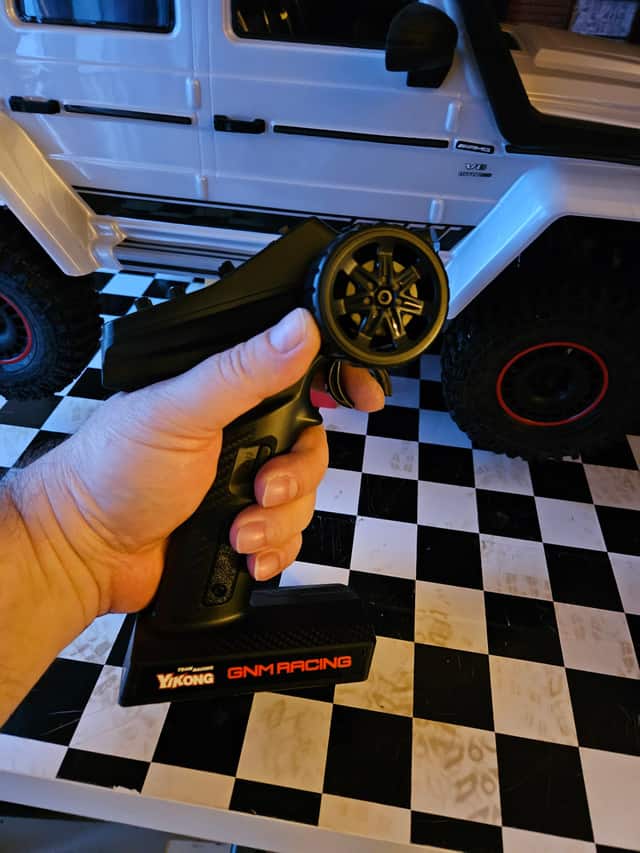
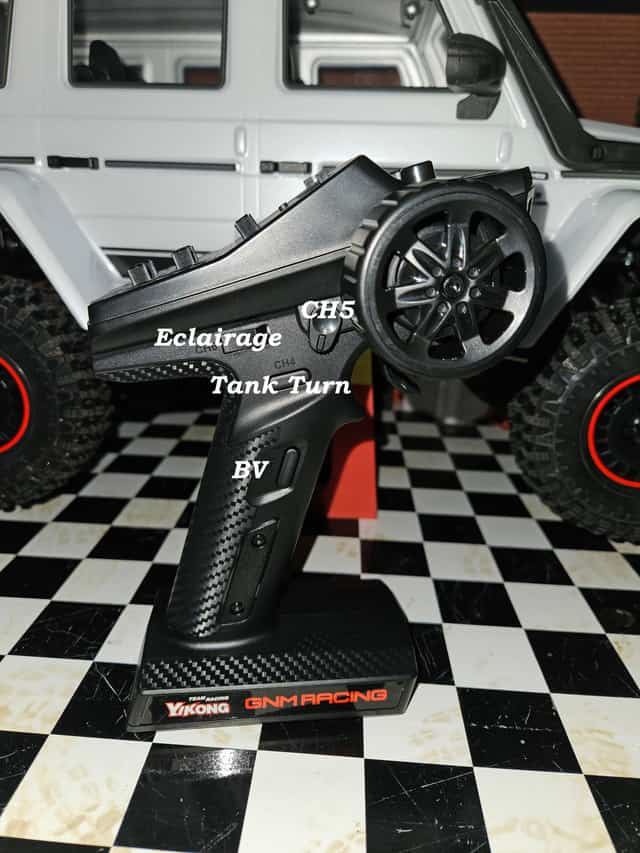
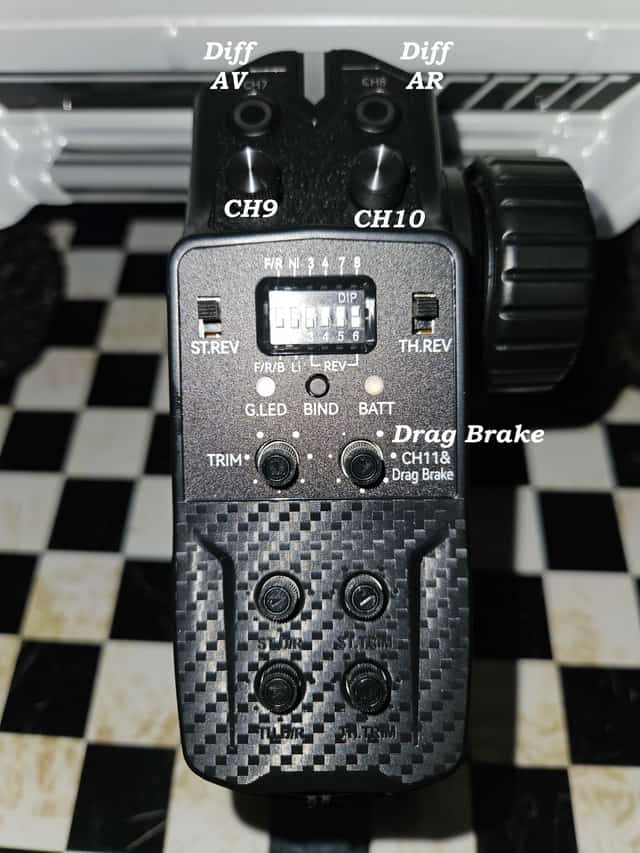
On the handle, we access channels 3 (gearbox), 4 (Tank Turn), 5 (unused potentiometer) and 6 (lighting). On the top, it’s more crowded… in addition to the traditional trim and dual-rate settings for channels 1 and 2 and a “Bind” button, we find, from top to bottom, channels 7 ( front diff lock), 8 (rear diff lock), 9 (unused potentiometer), 10 (unused on-off button) and 11 (adjustable drak-brake), but also a series of switches which respectively allow you to modify the driving mode (F/B/R or F/R), battery chemistry (LiPo or NiMh) and inversion of channels 3,4,7 and 8.
3 LEDs brighten up the whole thing… on the left, “G.led” indicates the radio’s battery level, on the right, “Batt” indicates the vehicle battery charge level… all- goes well “green”, low fuel warning “orange” and too-late “red”. A vertical LED strip in the front brights green when everything is fine, switches to orange if there is a problem.
All “button” channels emit a beep corresponding to the selected position… 1 when returning to the start, 2 beeps in the 2nd position, and 3 beeps for the 3rd position of ch6. The potentiometer channels do not have a marked midpoint, but emit a beep instead.
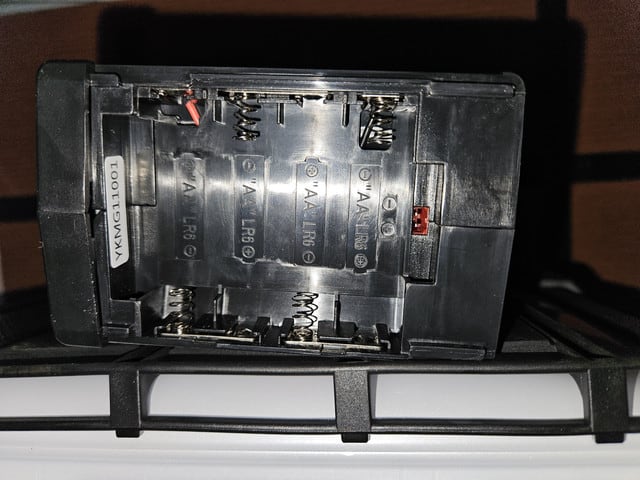
On the power side, it will only need 4 AA batteries, or a radio battery, a connector being present. As no information is provided on the cut-off, a NiMh battery might be a wize choice.
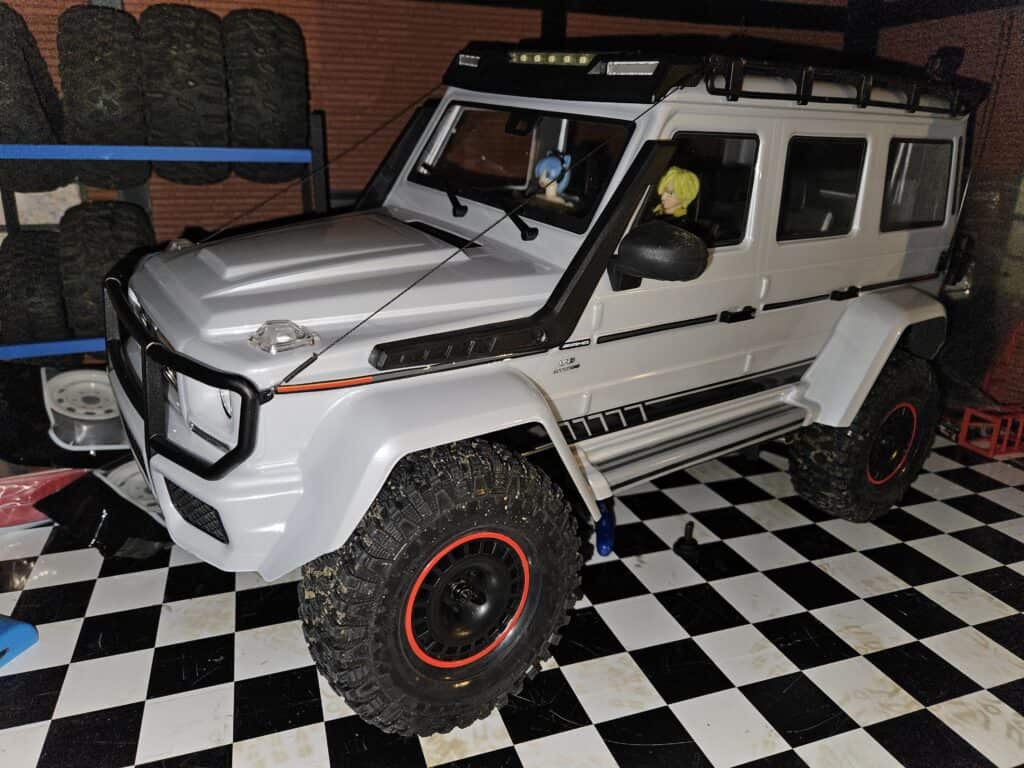
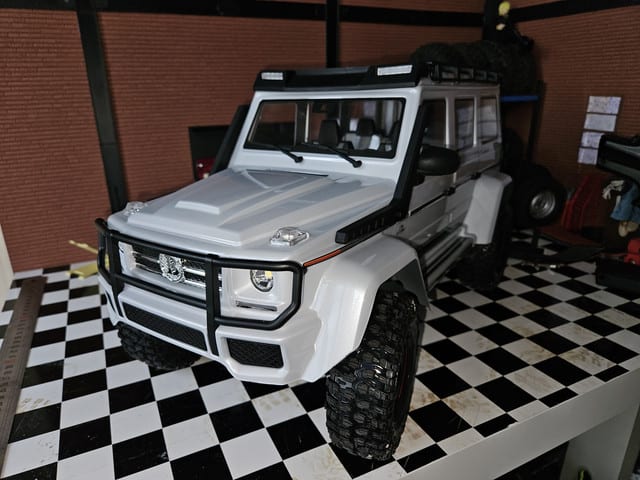
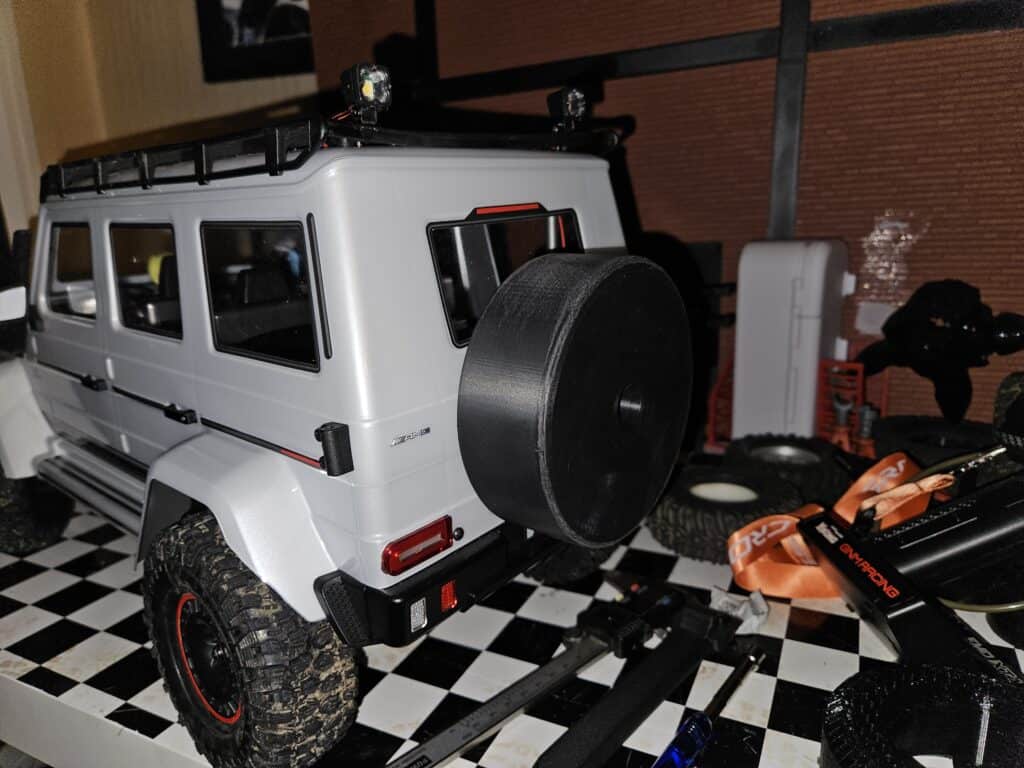
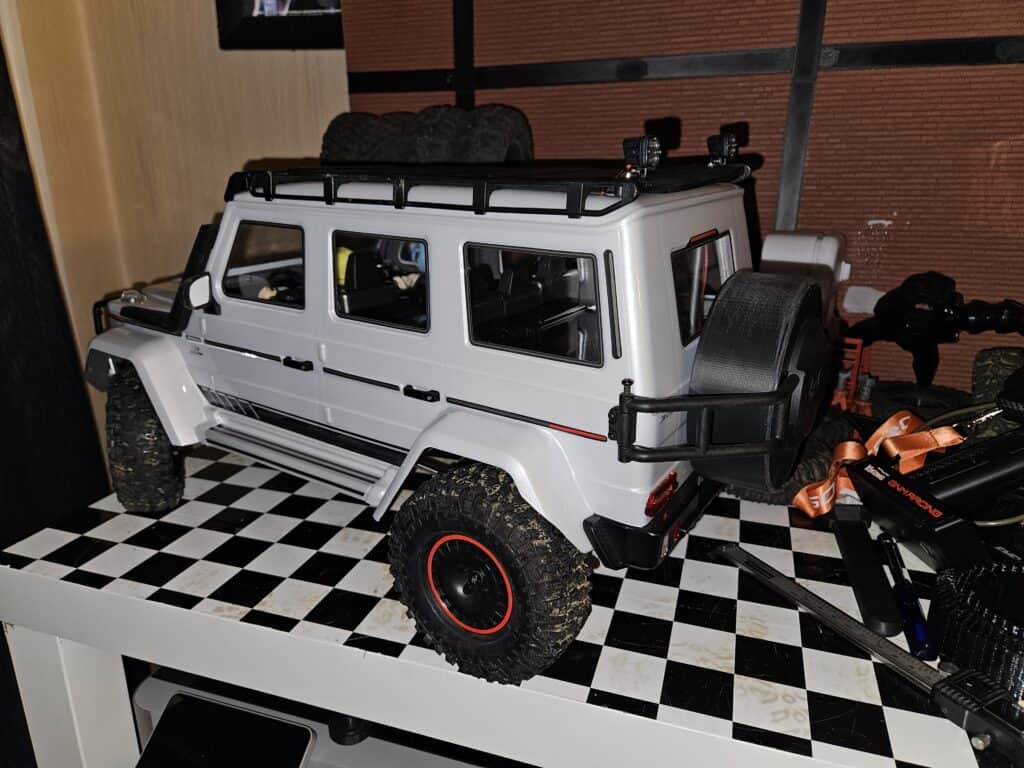
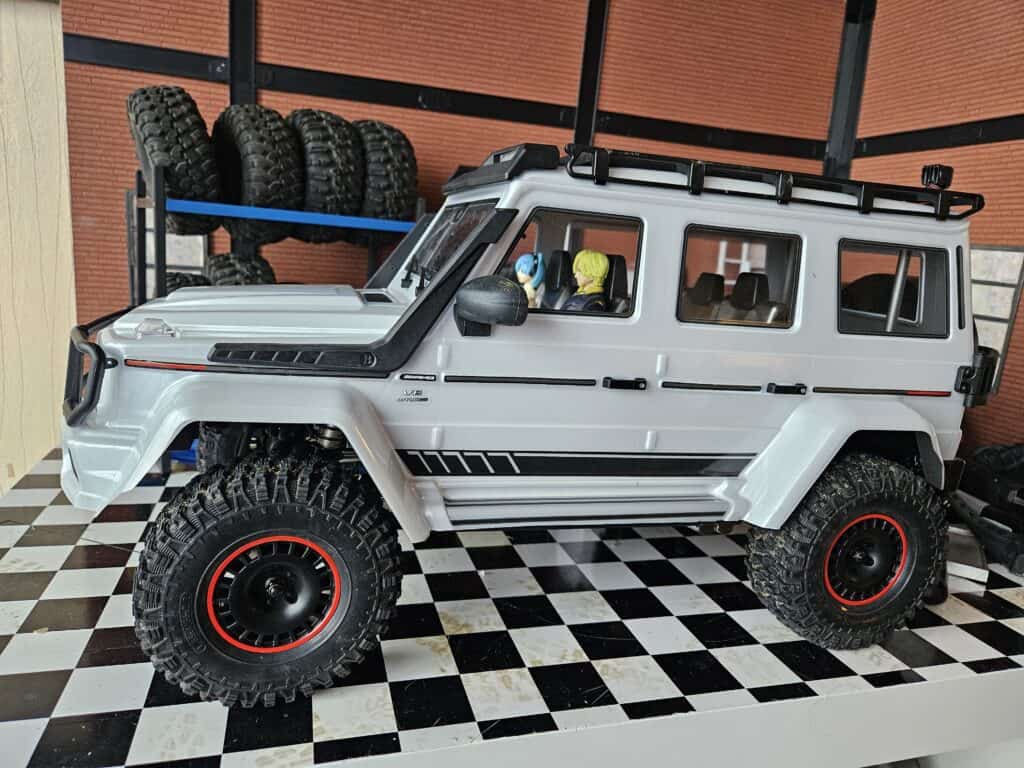
White might not be the best color for such a sharp-lined body, it softens the lines a lot. However, this silver-backed pearly white looks much better in real life than in a photo taken with a smartphone.
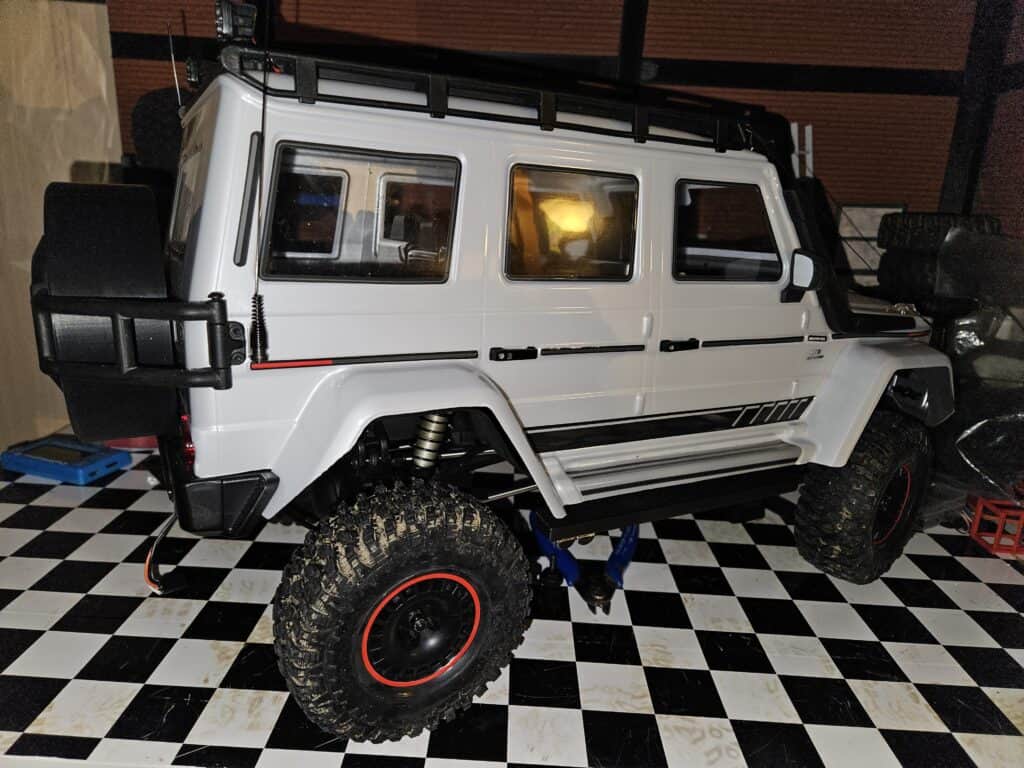
If the holy grail remains the crawler with ABS bodywork for its details, this lexan bodywork is not left out however, a number of plastic accessories add detail where it is visually the most interesting… grilles, doors handles, windshield wipers, rubber mirrors, rear light units, “Brabus” roof gallery and pods, and for this Pro version, snorkels and a fake spare wheel support which is not discreet (at the same time , this is not the clientele targeted by Brabus).
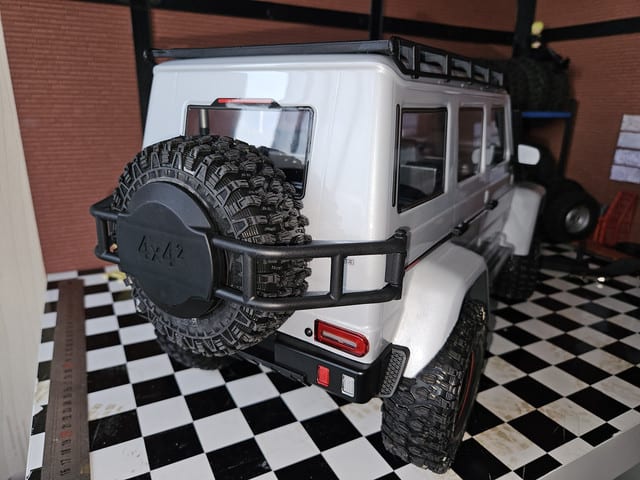
No body clips like for its more economical models (Khamba, LC70), YiKong favors a tilting body system. No magnets with their horrible screws pocking from the hood like on the Sherpa (YK4103) either, just one screw at the front … better not loose it.
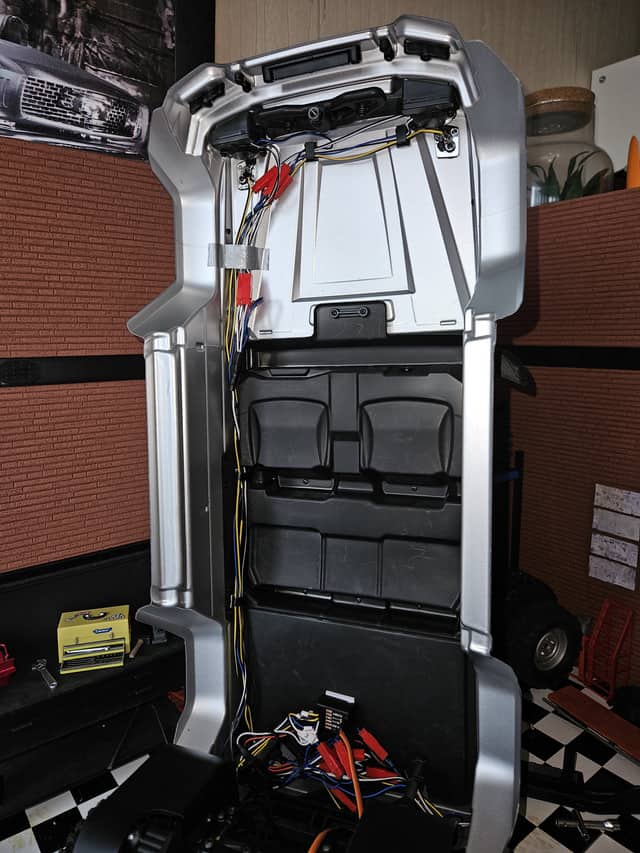
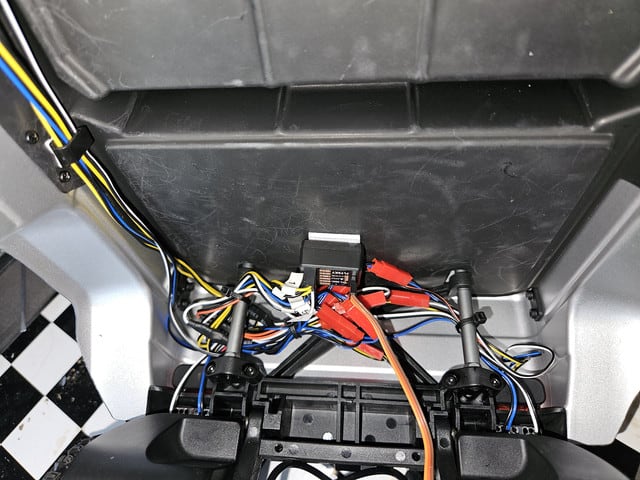
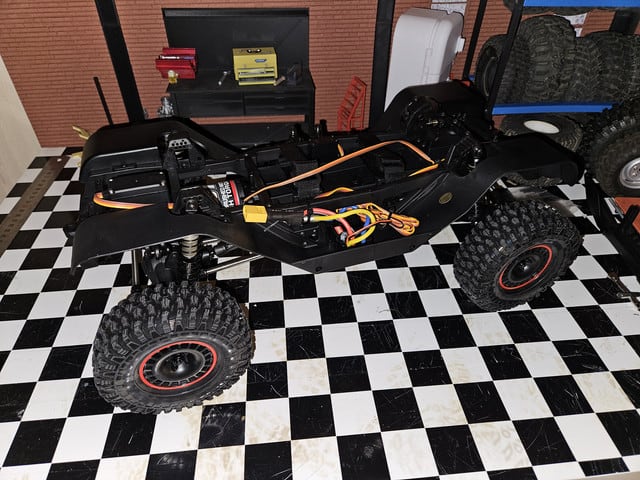
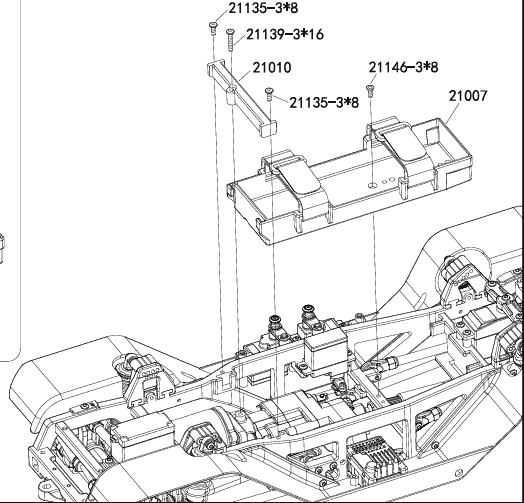
All the wiring related to lighting is grouped at the rear, between the 2 columns which reinforce the body … the physical separation of the body from the chassis is limited to removing 2 screws and disconnecting the cable from the lighting module.
The lighting is quite powerful, controlled by the radio (ch6) with 3 positions… off, position lights and full headlight. It integrates reverse and stop… but the latter only works in F/B/R mode, so unfortunately no stop in crawler mode.
Unfortunately, my module was defective… no reverse gear out of the box, and shortly after, no more position lights, unless interchanged with the full headlights.
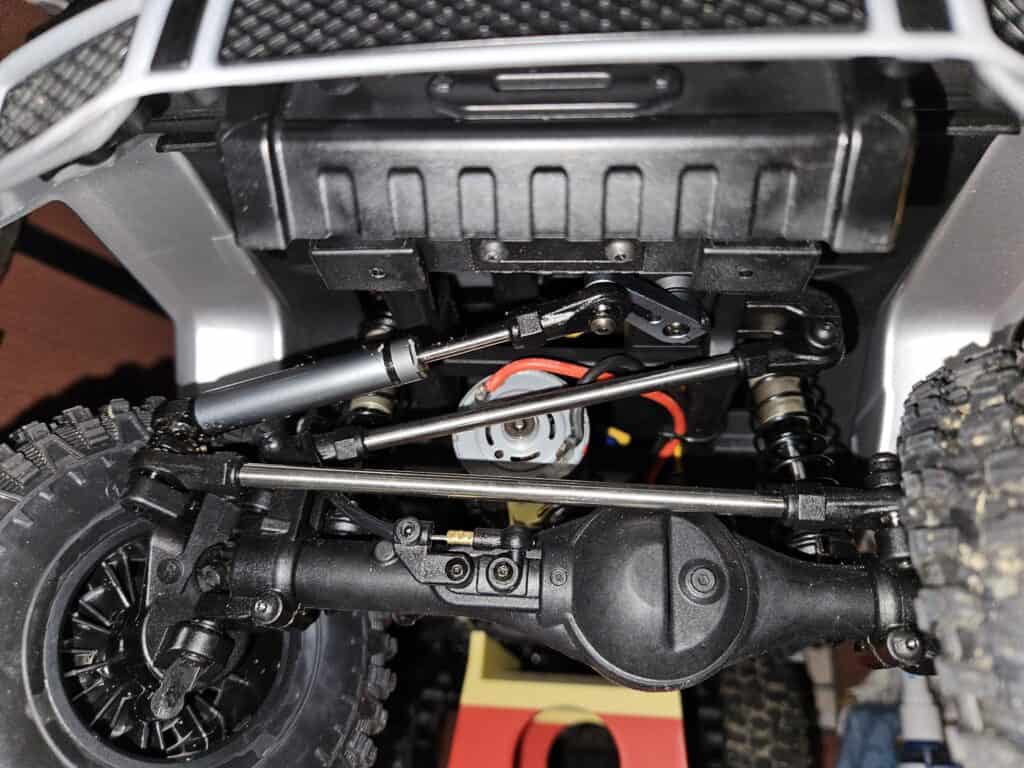
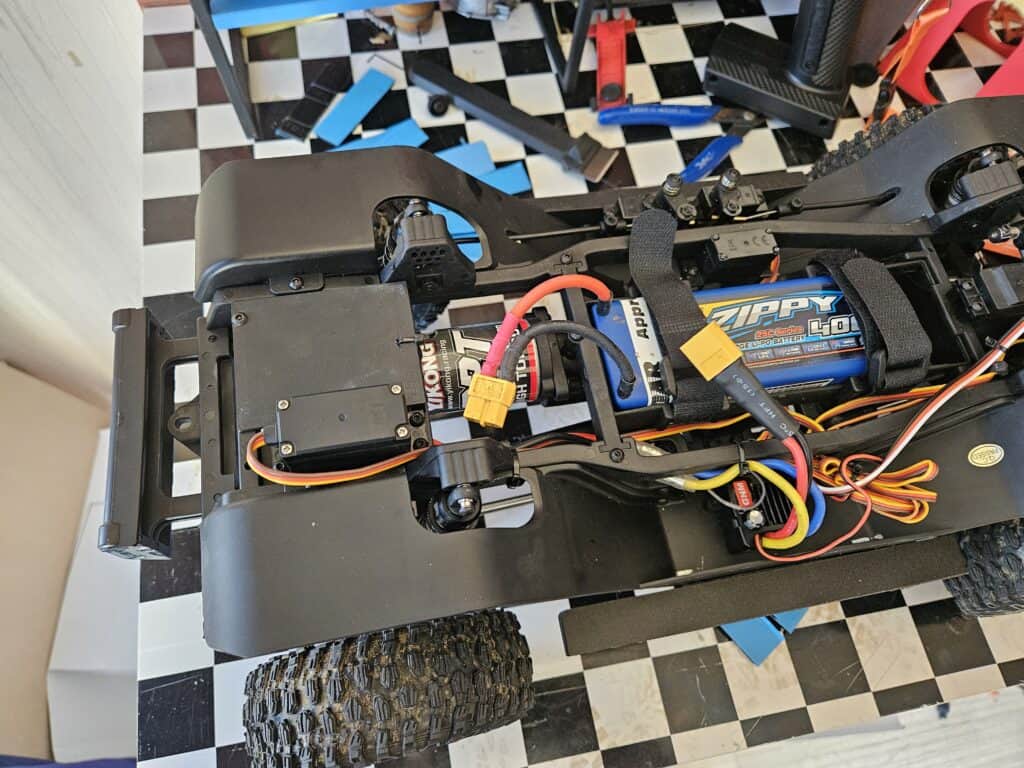
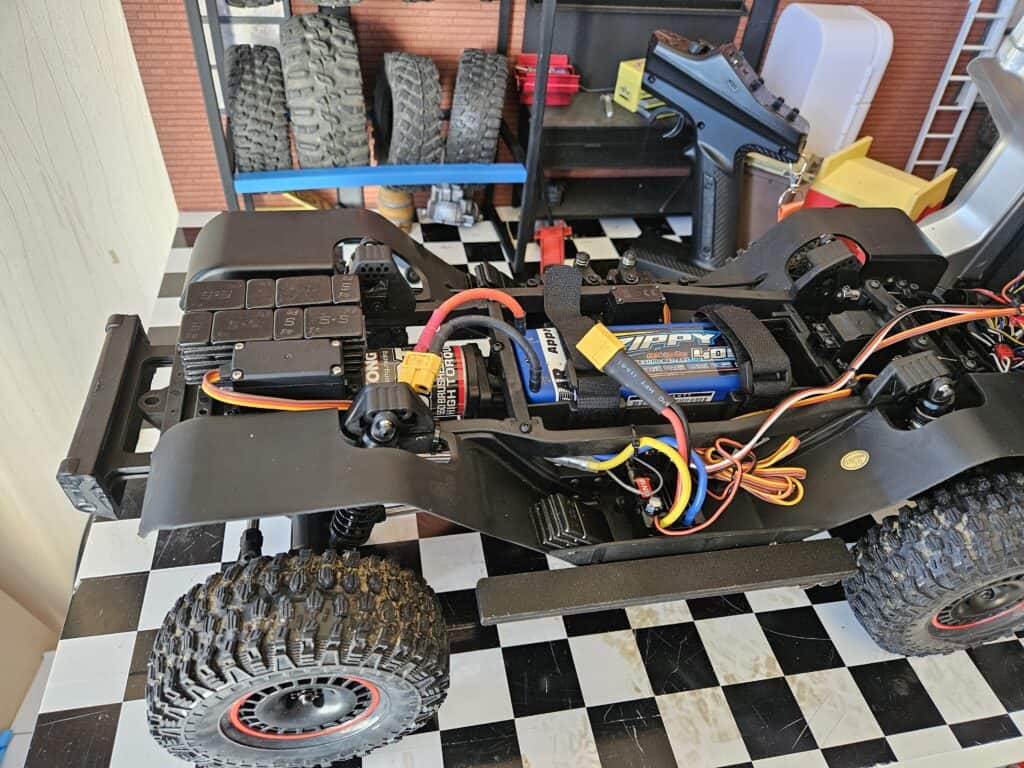
The ESC is a 2-in-1 type, combined with the receiver, and with a capacitor on its XT60 connector. It supports up to 3S in LiPo and its 6V BEC can provide 5A. The 2-in-1 aspect can be prohibitive for some, especially since such a vehicle will require at least 8 channels and mixing if you want to go brushless. However, though not available yet, there’s a standalone receiver on the spare parts catalogue to keep the RTR radio. The engine is a 550 32T where we usually find a 21T, with a 14T mod 0.6 pinion, in a compact and low-profile transmission without a slipper, but with metal gears.
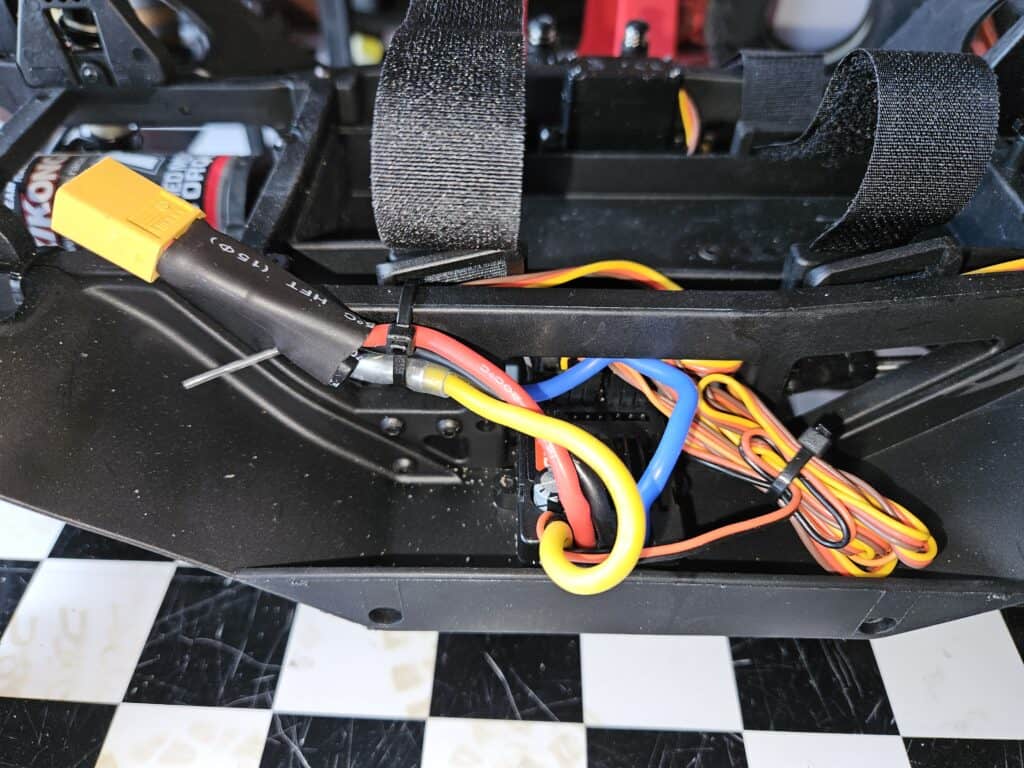
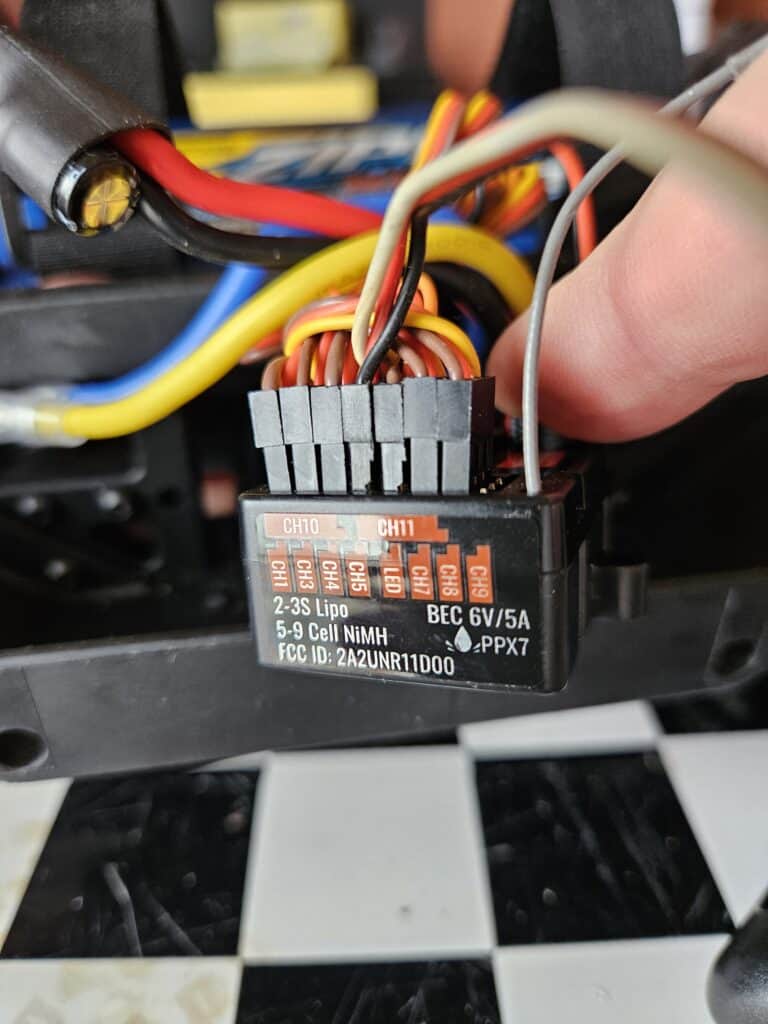
4 channels are available but only 3 are really free for accessories, as long as they can be controlled by potentiometers (5, 9) or on-off (10). channel 11, already assigned to the drag brake, also works, but the benefit of using it for an accessory is quite limited.
The ESC, with the reduction provided by the portals, gives a honorable and functional progressiveness.
The interior is semi-3D, with added steering wheel and headrests, and just enough stickers to give the illusion of a 4×4² interior. Of course, with this type of interior, we are limited to the use of “trunk” drivers. Painted from below, it is rather shiny, a veil of matte varnish would not stand out but it is not essential.

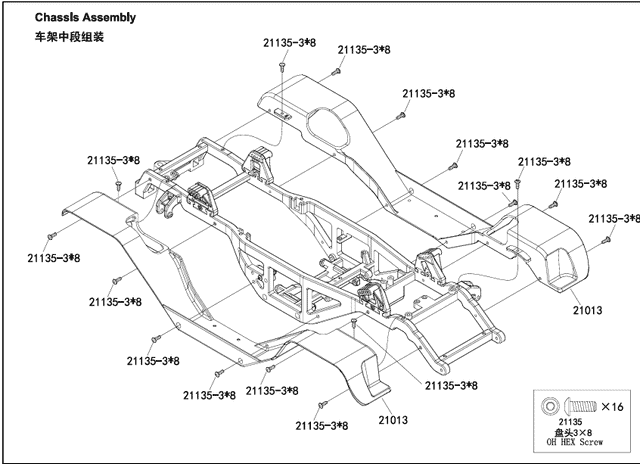
And now lets go for what will be the subject of controversy, the chassis…
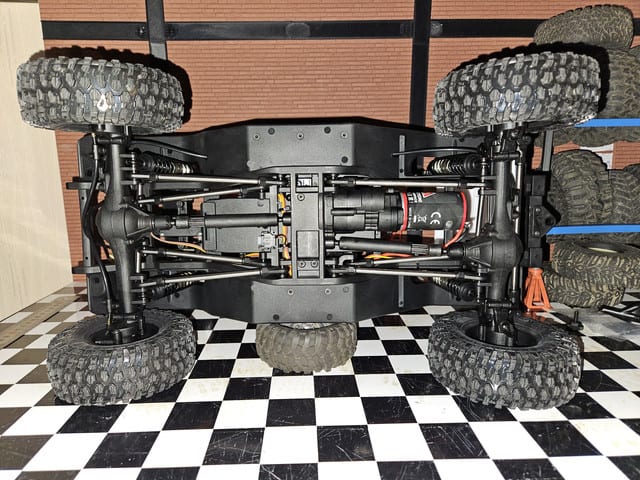
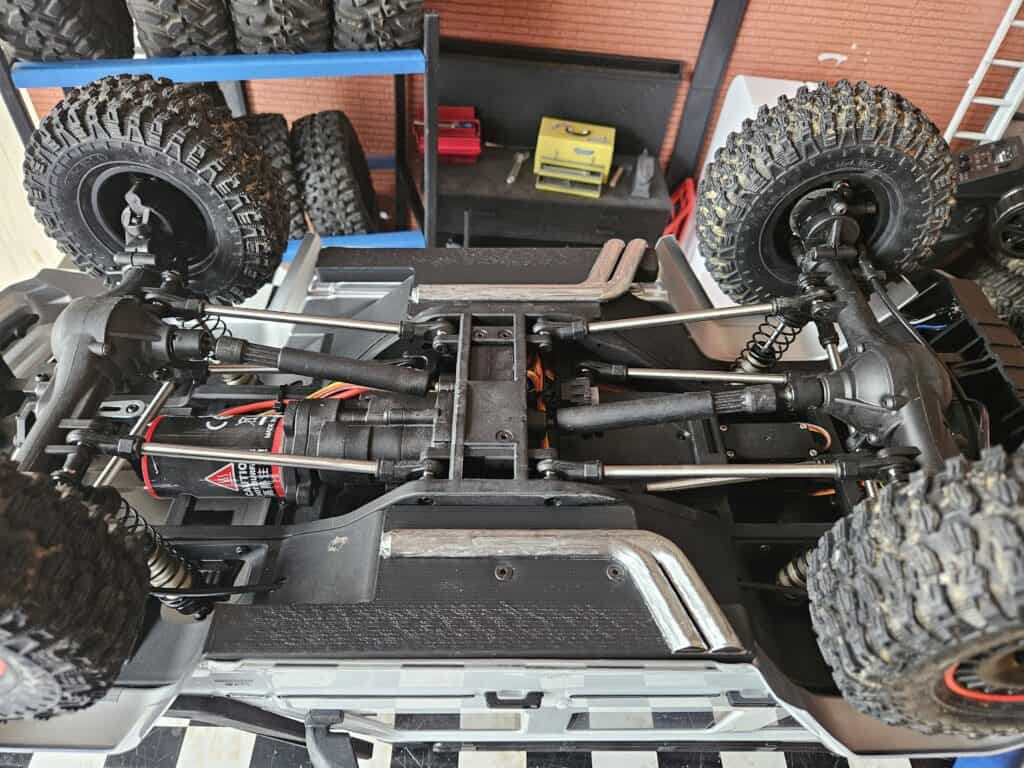
Entirely made of fibered nylon, we have the impression of dealing with a Tamiya chassis on steroids, a TVP chassis whith a beer belly. For those who expected to have a packet of noodles in their hands, think again, it’s sturdy, rigid as can be… at least as rigid as a RedCat Gen8 wich has traditional frame rails but twice as big as those of classic chassis. On the other hand, as a result, this is not a chassis intended to be modified, nor one that will provide a lot of opportunities for the aftermarket… fans of personal creations or aluminum parts, move on, there’s nothing to see.
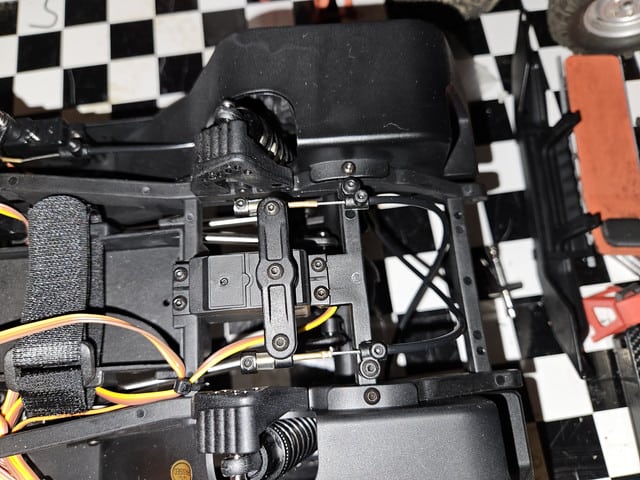
If this chassis may seem like a “toy” to some, it is nonetheless well designed with relatively few added elements for maximum rigidity, while leaving the door to adaptations for other models. A large central block, which will accommodate the entire mechanical parts, on each side, wheel arches forming bathtub to accommodate the electronics on one side, the differential servos on the other, and finally in the center, a battery tray placed as low and front as possible above a very “horizontal” transmission… the masses are centered as much as possible under the top of the chassis, very little protrudes.
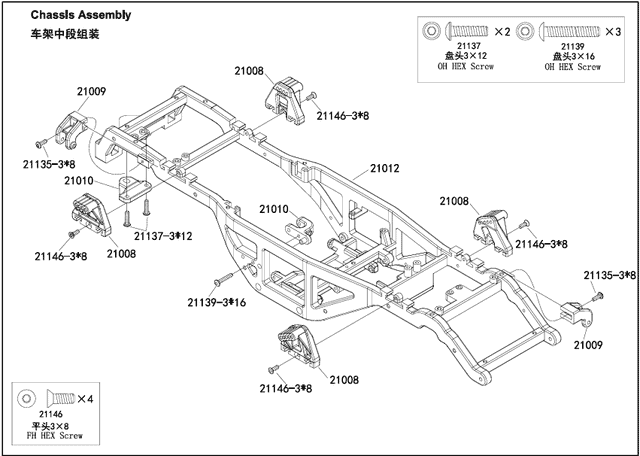
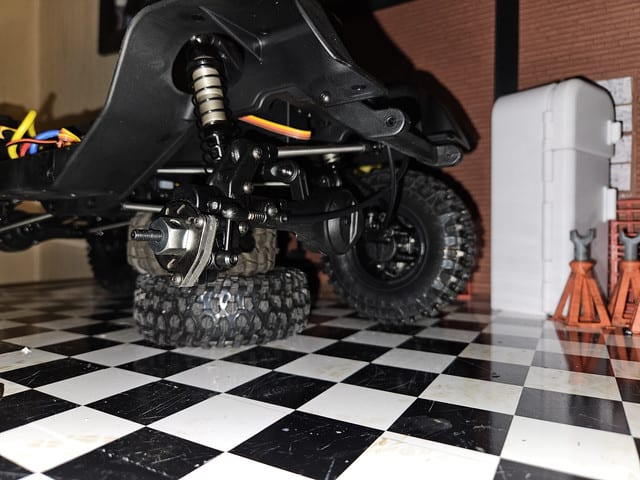
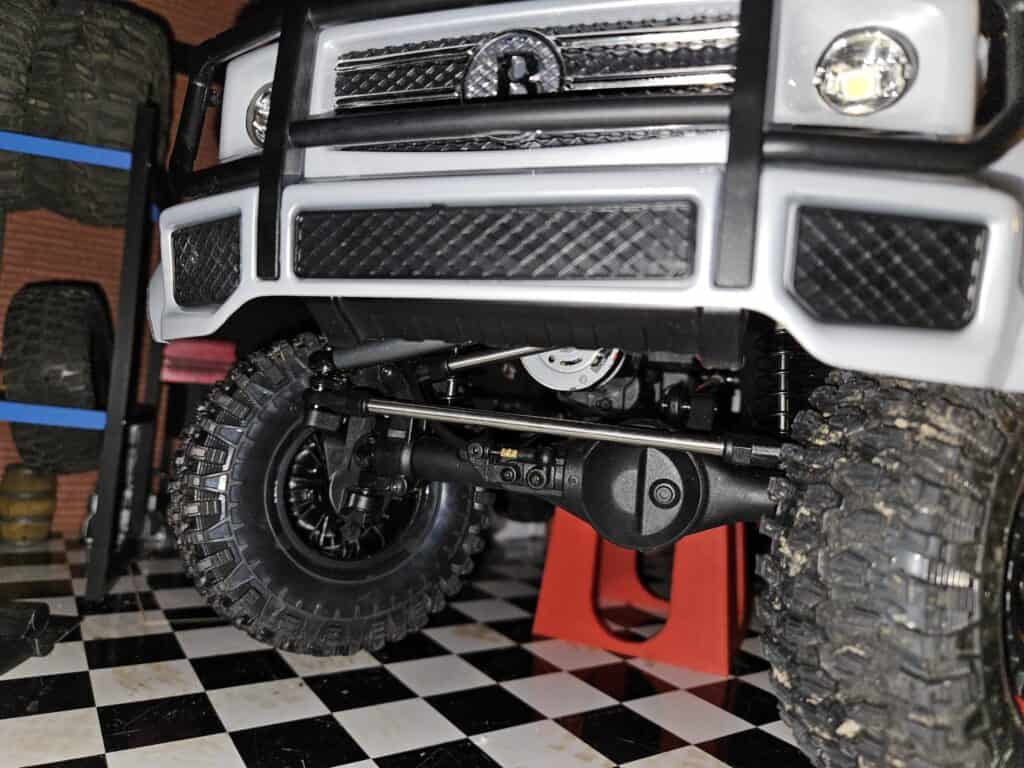
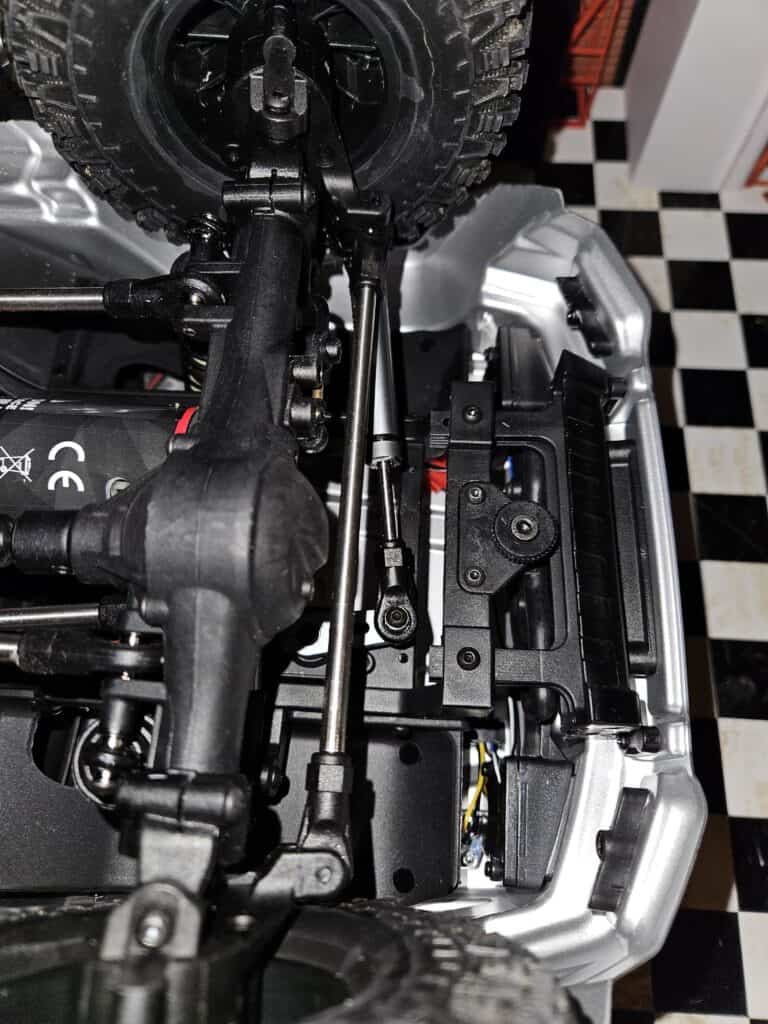
The links are made of metal … 3 in front + Panhard bar, 4 behind + … Panhard bar. We would be tempted to remove the rear Panhard bar, or an upper link, but that would be a mistake, the rear does not have as triangulated links as on other crawlers on the market, the Panhard bar is therefore very effective in guiding the rear axle, no hard points or constraints are observed when the suspensions are compressed.
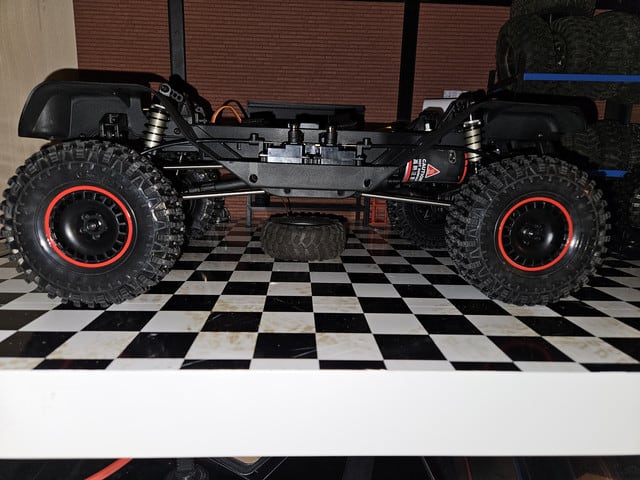
The skid-plate is quite narrow and hollow. In itself, it’s very realistic, its shape is reminiscent of a 1:1 transmission crossmember… but on the terrain, it might hang.
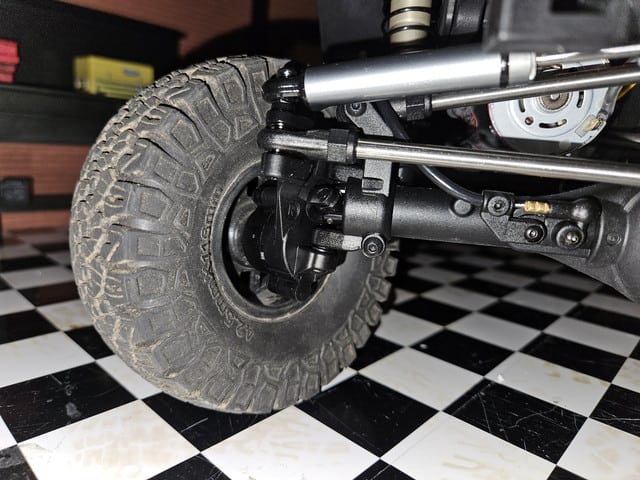
The driveshafts do not give in to the Wild-Boar fashion… personally, I have never understood the interest of this system on a crawler, it is more points where the terrain can hang, it must be be well calculated otherwise you risk losing some bits along the way (UMG10 6×6 owners appreciate it), and it is of very limited interest for repairs given that we never have the right “half” on hand . So 2 parts driveshafts, old-fashioned, but counter-rotating to help mitigate torque-twist as long as the 4 wheels touch the ground.
In the Pro version, the shock absorbers are full aluminum (SE plastic body), filled with #500 oil (35-40wt), adjustable in pre-load, and of emulsion type. They look leak-proof and work without hard spots.

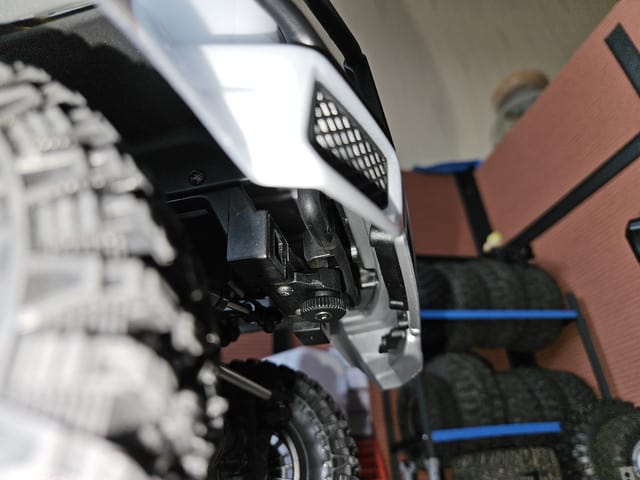
The wheel hexes are metallic, with through screws, and the portals… very small… it will be interesting for the choice of wheels and for the CG… you will not have to count on the 80mm of ground clearance of a Traxxas (or the 99mm versions on needle heels), here, only 65mm.
For the steering, YiKong opted for its traditional servo saver in the form of a steering damper. No replacement link like for the Sherpa, but the springs are firm and it shouldn’t be felt too much at use. The servo is 25kg and the horn is made of aluminum.

The axkes are new at Yikong… with a more scale look and an off-center front axle. The locking system may seem very exposed, but being a slide type, it shouldn’t be as an issue as lever models, and it allows for an easy-to-access manual version for the SE trim.
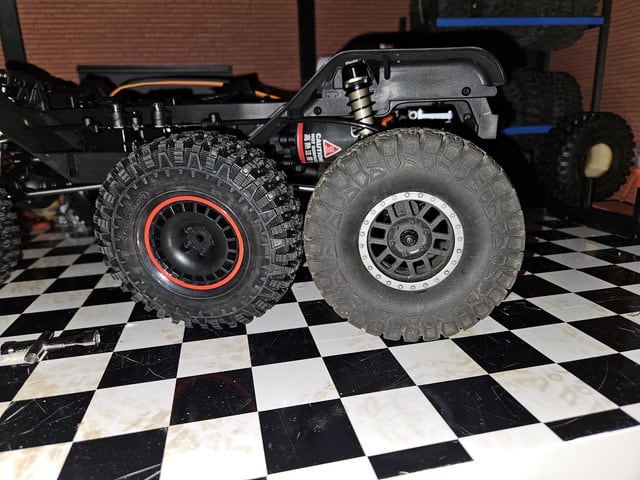
Unlike the Sherpa which is equipped with wheels with an outside diameter of 1.9 and 2.2 on the inside, YiKong has this time used the wheels of its YK6101 (6×6), with a very “Brabus” look, but in 2.2 on both sides. If the design of the lugs does not fail to recall Proline’s HiRax, the diameter is of an unusual size for 2.2 with 115mm … and there is not that much margin under the fenders. Unfortunately, as is often the case in RTR, the wheels are not beadlock … it’s a shame, because the foam would deserve to be a little more flexible. However, the reduced size of the portals makes it possible to do what required track wideners for most of the 1.9 wheels on their previous models… here a SCX10.2/FreeMen wheel which did not fit as-is on the Sherpa, and which here goes with some margin.
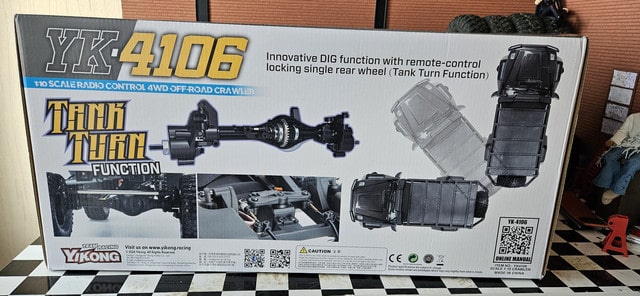
Finally, the function that mainly makes this model unique, the Tank Turn… a DIG, but on a single wheel, more commonly known as the Cutting Brake in 1:1.
Unlike a DIG which locks the rear output of the transmission, and therefore the 2 rear wheels, when you activate channel 4, the rear differential is unlocked if needed and when you turn, a rear servo brakes the inside wheel, which should make it possible to obtain a better turning radius, with less friction since the outer wheel participates in the change of direction instead of dragging.
When exiting “Tank Turn” mode, the rear differential remains unlocked, even if it was locked before. On the other hand, during the entire time the “Tank Turn” mode is active, the radio emits a double beep every 2 seconds… failing to see that the ch4 button is turned on, there is no risk of forgetting that the mode is active.
Youtube playlist :
Specifications
Wheelbase : 325mm
Overall length : 534.5mm
Height : 267mm
Width : 247mm
Attack angle : 63°
Departure angle : 58°
Center ground clearance : 65mm
Axel ground clearance : 50mm
Weight : 3.8kg
Weight bias front/rear : 46/54
Driving, upgrades and modifications
Added the old LED bar from my Twin Hammer at the front, and Injora pods at the rear, all controlled by a switch connected to channel 10 (on-off). The pods just needed to drill a hole to pass the wiring along one of the reinforcement columns, and obviously to drill the gallery. For the ramp, holes to fix it and the reuse of one of the pre-existing holes of the front right pods, then descent along the windshield with the power supply of the front pods, hence the position of my relay (whose too short cable as been replaced since)


The functional spare wheel is nice, but it’s 100g on the ass and is rarely useful. In foam, it may be lighter but it is already 50g saved in 3D printing (in ASA).
https://www.thingiverse.com/thing:6545408
There is a significant gap behind the body bumper, which exposes it to wear. If you don’t plan to cut the body to install the optional bumper, there is a way to add protection.

Take the optional bumper and cut its ears off…then install it into the bumper bracket at the end of the chassis.
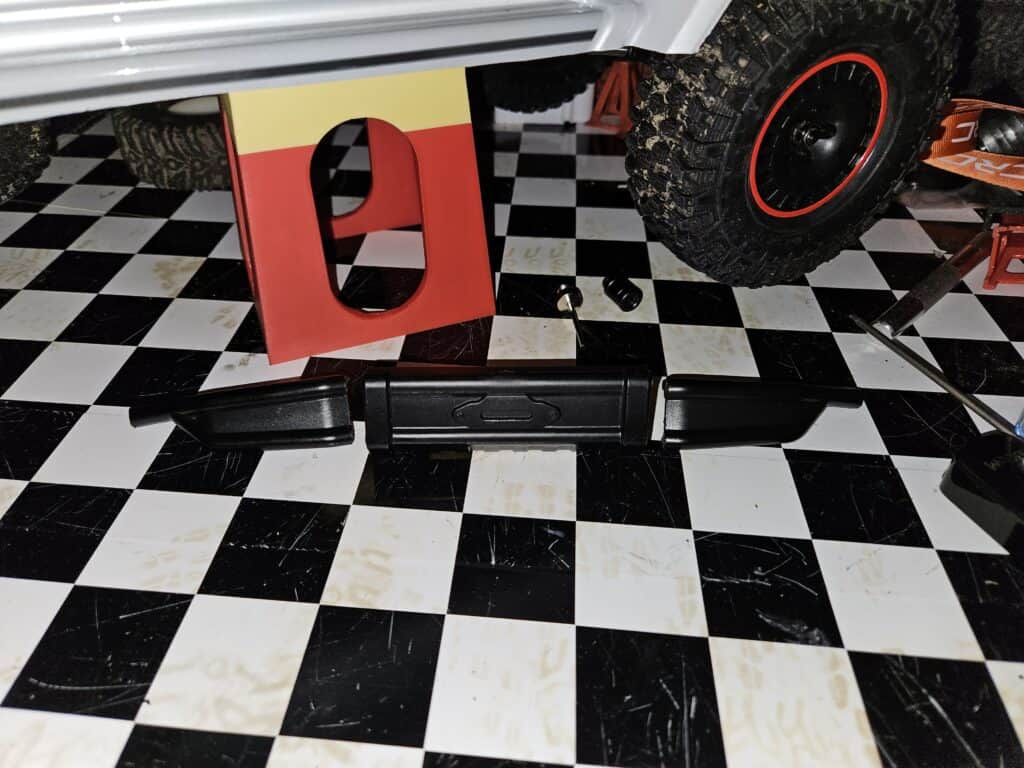
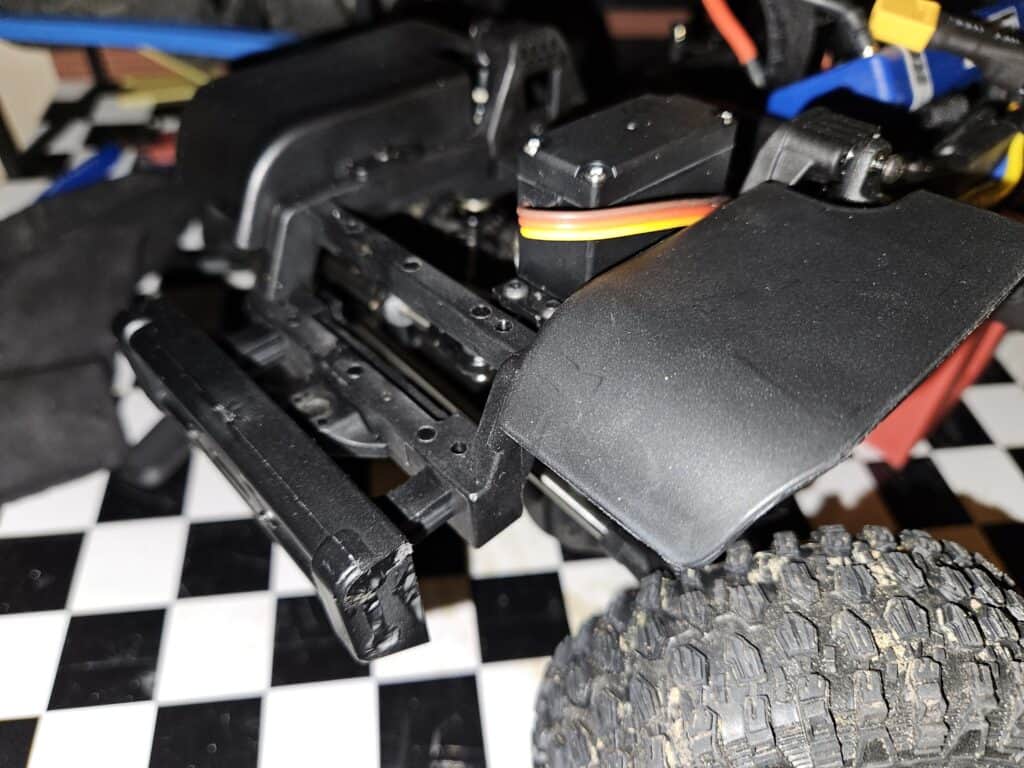
This way, no more space, the body bumper rests on the chassis bumper… at least on its central part. And it doesn’t interfere with locking the body.
As with the bumper, the body side-steps are away from the chassis. The particular shape of the latter prevents the use of aftermarket sliders due to lack of available moutings. To protect the body, I designed sliders which reuse the screws from the ESC on one side, from the rear diff servo on the other, and which add a basic exhaust. Printed in PETG-CF, they should last a while.

https://www.thingiverse.com/thing:6556304
The original weight distribution is not particularly good at 46/54 in favor of the rear. I’m waiting for the axle and chassis weights (for the front only), but in the meantime I’ve added some weights…
With the battery, 60g on each side at the front of the bathtubs and 360g next to the servo on a printed plate, for a total of 480g to which are added the weight saved and lost by the different prints… the distribution is now about 53.4/46.6 in favor of the front… it’s better.
The total weight when ready to drive increases to ~4.2 kg…
https://www.thingiverse.com/thing:6560868
The antennas are from Injora.
The branch guards are made of nylon fishing line (diameter 0.37 but larger would not have been out of place), heat-shrink tubing and superglue… they are not intended to be functional, I prefer that they do fuse rather than tearing off the bumper or roof rack.